Follow through the steps of this tutorial for a quick introduction to the process of modeling and modification databases with Database Designer for MySQL.
Stage 1. Determining requirements
Stage 4. Setting table parameters
Stage 5. Defining table columns
Stage 7. Creating and designing the rest of tables
Stage 8. Creating foreign keys
Stage 10. Generating the database
Stage 11. Altering the diagram
Stage 12. Synchronizing database with the diagram
Please note:
The database diagram, which we develop in this section, is placed in the tutorial-first-diagram.mdd in the Samples directory in the program installation path.
Stage 1. Determining requirements
The aim of our tutorial is to develop the database for a simple car ordering system.
First, let's determine the requirements of our database:
| · | it should store primary information about cars we sell, such as price, vendor, model, total displacement, link to vendor's website, etc... |
| · | we need information about our customers that have bought cars: customer name, company, phone, e-mail and other. Also geographical information is very important to us: one of functions of our exercise system is to generate sales statistics on the per-city basis. That is why we have to make effective queries to the database which contains conditions on cities. Note that we also must unambiguously identify cities. This leads to using to a customer city identifier instead of city name. This means that it is neccessary to store full information about cities separately. |
| · | and of course, ordering information must be stored (i.e. an ordered car from list of available, a buyer from our list of customers, a payment amount, a payment type, quantity and so on). |
So we should create and design the following tables:
| · | Cars for storing information about cars and theirs characteristics |
| · | Customers to store customers information |
| · | Cities to store information about cities where customers located |
| · | Orders to store ordering information. |
Now we'll examine the process of working with a table. And we'll do it on the Cars table example.
| 1. | Launch the application using the icon in the 'Database Designer for MySQL' program group in the start menu. |
| 2. | Select the File | New item on the main program menu to create a new database diagram. |
| 3. | You may save your diagram at any time by selecting File | Save. |
To create a new table in a diagram, click on ![]() icon on the Palette toolbar. Your mouse cursor will change its appearance. Click on the diagram area to create a new table. An empty table will appear in the diagram:
icon on the Palette toolbar. Your mouse cursor will change its appearance. Click on the diagram area to create a new table. An empty table will appear in the diagram:
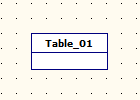
Now you are ready to begin defining the fields and parameters for the Cars table.
Stage 4. Setting table parameters
To start designing the table double-click on its diagram representation. The program shows you the Table Properties Editor you see in the following picture.
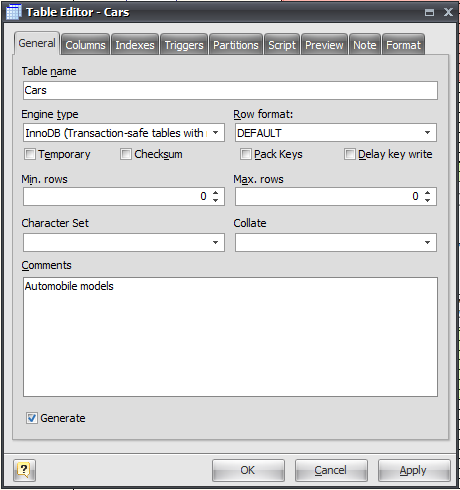
As you can see, you can set general table parameters such as a table name, type and other.
Specify in this window name of the table - "Cars" and change the Engine type to InnoDB. The last is required because we need to use a table primary key in foreign keys of other tables, as you will see later.
Please note:
You can read about InnoDB engine type in MySQL Manual: http://dev.mysql.com/doc/refman/5.1/en/innodb.html
Stage 5. Defining table columns
On this step we will create columns of the Cars table. As we saw in Stage 2 of this tutorial, we need to store general information about cars in this table.
Click on Columns tab of the Table Properties Editor that we've launched in the previous stage. The program displays the following window:
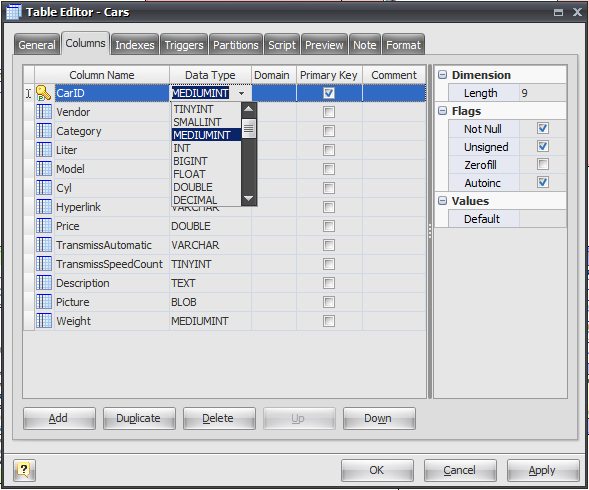
Now we're ready to begin defining fields for the Cars table.
First we'll create CarID column that will be used as the identifier of a car and as the primary key of Cars table.
Click the Add button to insert a new column to the table.
Be sure the insertion point is in the first row of the Column Name column, and then type in the name of the first field, CarID. Select next cell to use Data Type column. A button with a down arrow appears on the right side of the Data Type column. Here and elsewhere in Database Designer for MySQL, this type of button signifies the presence of a drop-down list. Click the down arrow or press Alt+Down arrow to open the list of data. In the Data Type column, you can either type in a valid value or select one from the list of values in the drop-down list. Select the appropriate data type for the column. In our case it is INT. In the Comments column you can enter a descriptive phrase for the column. Comments will help you to remember the destination of columns later and they will be displayed in reports.
Now we must set other column properties.
Database Designer for MySQL displays some property boxes in the field properties area in the left part of the Table Properties editor dialog. These boxes allow you to set properties - settings that determine how MySQL handles the column - and thereby customize a column. The properties displayed depend on the data type you selected; the properties appear with some default values in a place.
Since CarID is a surrogate primary key for the Car table, we must set AUTO_INCREMENT and UNSIGNED (to eliminate wasting of table space) properties for that. Click on the Autoinc and Unsigned checkboxes respectively.
Get back again into the column grid. Press Ctrl + Down or use once again the Add button - this creates a new table column. Enter Vendor as a new column name and then select VARCHAR as a data type. Set a property Length to 50 at the right dialog pane. You have created a new column and set parameters for it.
Then add several columns (and set parameters) for storing other car characteristics:
Category: VARCHAR. Length 10.
Model: VARCHAR. Length 30.
Liter: DOUBLE. Length 15. Decimals 3.
Cyl: TINYINT.
Hyperlink: VARCHAR. Length 255.
Price: DOUBLE. Length 15. Decimals 3.
TransmissAutomatic: VARCHAR. Length 5.
TransmissSpeedCount: TINYINT.
Description: TEXT.
Picture: BLOB.
You can add any columns you prefer for describing cars.
After creating columns, click the Apply button and then select the Preview tab of the Table Properties editor. Database Designer for MySQL will show you the SQL script representing your table on current stage. You will see the following script:
DROP TABLE IF EXISTS `Cars`;
CREATE TABLE `Cars` (
`CarID` int(11) UNSIGNED NOT NULL AUTO_INCREMENT,
`Vendor` varchar(10),
`Category` varchar(50),
`Liter` double(15,3),
`Model` varchar(10),
`Cyl` tinyint(4) UNSIGNED DEFAULT '0',
`Hyperlink` varchar(255),
`Price` double(15,3),
`TransmissAutomatic` varchar(5),
`TransmissSpeedCount` tinyint(4) UNSIGNED DEFAULT '0',
`Description` text,
`Picture` blob,
PRIMARY KEY(`CarID`)
)
ENGINE=INNODB
COMMENT = 'Automobile models';
In the diagram you can see following graphical representation of the table:
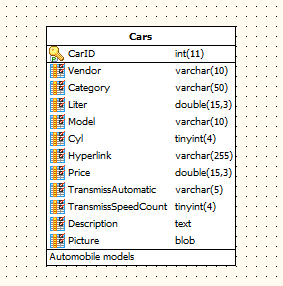
We have completed designing the table columns.
Since we have to create queries to the Cars table with several conditions, it is important to optimize the speed of their execution. So we need to add indexes to the table. Determine columns what will be included into the conditions. Suppose it will be the Vendor and Category columns.
Click on the Indexes tab of the Table Properties editor. This dialog shows in the following picture:
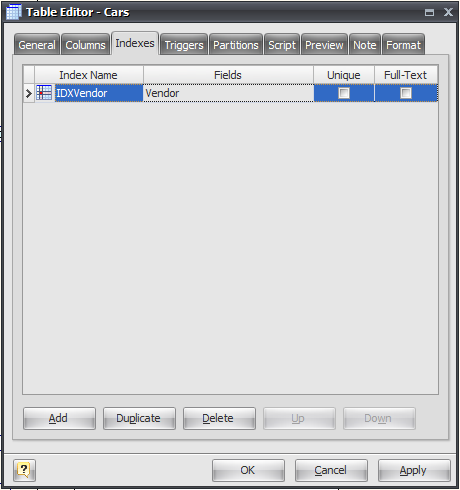
Let's create an index for the Vendor column. Click Add button to create a new table index.
Be sure the insertion point is in the first row of the Index Name column, and then type the index name, IDXVendor. IDX is the prefix intended to distinguish column names from index names. Click next cell to select fields that will be a part of index. Drop down menu with a list of table columns will appear. Click on the checkbox near the Vendor field. Please note, that you can create a multi-column index if your SELECT-queries conditions contain more than one column, but now we use only one column for simplicity. Then click the OK button on the drop-down menu to confirm your selection. You have created the index.
Do the same for the second index for the Category field.
After that, check the Preview tab of the Table Properties editor:
DROP TABLE IF EXISTS `Cars`;
CREATE TABLE `Cars` (
`CarID` int(11) UNSIGNED NOT NULL AUTO_INCREMENT,
`Vendor` varchar(10),
`Category` varchar(50),
`Liter` double(15,3),
`Model` varchar(10),
`Cyl` tinyint(4) UNSIGNED DEFAULT '0',
`Hyperlink` varchar(255),
`Price` double(15,3),
`TransmissAutomatic` varchar(5),
`TransmissSpeedCount` tinyint(4) UNSIGNED DEFAULT '0',
`Description` text,
`Picture` blob,
PRIMARY KEY(`CarID`),
INDEX `IDXVendor`(`Vendor`),
INDEX `IDXCategory`(`Category`)
)
ENGINE=INNODB
COMMENT = 'Automobile models';
Pay attention to the last lines of the table body formatted bold.
Please note:
You don't have to create an index for the primary key column - Database Designer for MySQL already did it for you.
You can adjust your table colors at Format tab of the Table Properties editor or with Color Palette
Stage 7. Creating and designing the rest of tables
Now we shall create the rest of the tables of our system database. They are: Customers, Cities, Orders.
Please note:
You can skip this laborious section and use the ready-to-use diagram tutorial-first-diagram.mdd bundled with the product in the Samples directory.
The process of table creating, defining columns and indexes is fully described in Stages 3 - 6 of this tutorial.
Please, create the following tables:
Table Customers
Columns:
CustID: MEDIUMINT UNSIGNED, AUTO_INCREMENT, PRIMARY KEY
Address: VARCHAR
Company: VARCHAR
Customer: VARCHAR
Description: TEXT
Email: VARCHAR
FaxPhone: VARCHAR
FirstName: VARCHAR
HomePhone: VARCHAR
LastName: VARCHAR
Occupation: VARCHAR
Prefix: VARCHAR
Source: VARCHAR
Spouse: VARCHAR
State: VARCHAR
Title: VARCHAR
ZipCode: VARCHAR.
Indexes:
for column Email.
Table Cities
Columns:
CityID: MEDIUMINT UNSIGNED, AUTO_INCREMENT, PRIMARY KEY
CityName: VARCHAR.
Table Order
Columns:
OrderID: MEDIUM INT UNSIGNED, AUTO_INCREMENT, PRIMARY KEY
Description: TEXT
PaymentAmount: DOUBLE
PaymentType: VARCHAR
PurchaseDate: DATE
Quantity: TINYINT
Time: TIMESTAMP.
Indexes:
for column PaymentAmount
for column PurchaseDate.
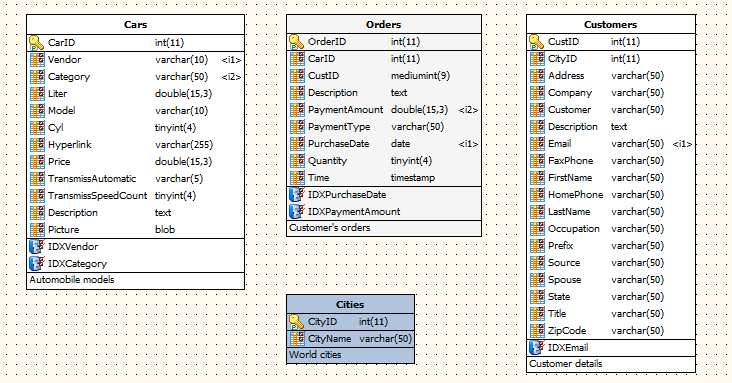
When you finish you should get the following diagram:
Stage 8. Creating foreign keys
You have probably noticed that at the previous stage we didn't store customer and car information in the order table. And we didn't link customers with cities.
Please note:
You may skip the current stage and fill this the gap in our diagram by adding the column CityID to Customers table, and CarID and CustID columns to table Orders. But if you plan to use the MySQL foreign keys we recommend you to examine the current stage.
Database Designer for MySQL supports MySQL foreign keys. Foreign keys are responsible for data referential integrity in your database. Simply put, referential integrity means that when a record in a table refers to a corresponding record in another table, that corresponding record must exist.
As we know, the Customers table must be linked with the Cities table by the CityID column. When a new row is inserted in the Customers table, it must have a corresponding record in the Cities table. If you define the CityID column of the Customers table you enforce MySQL to produce such checks.
You can define a foreign key in any MySQL table type, including the default MyISAM table type, but they do not do anything - they are only used to enforce referential integrity in InnoDB or Falcon tables.
In order to create a foreign key in MySQL, you need the following:
| · | Both tables are to be InnoDB (or Falcon) tables |
| · | The following syntax should be used: FORIGN_KEY (fk_fieldname) REFERENCES table_name (fieldname) |
| · | The field being declared a foreign key requires to be declared as an index in the table definition. |
Please note:
Since MySQL v4.1.2 indexes for foreign key columns are created automatically. So Automatically create indexes for FK-columns option in Diagram Properties dialog is disabled by default.
Database Designer for MySQL will help you to do it in one action by creating a reference between two tables.
To create a reference between tables, click on Reference (![]() ) item on the Palette tab of Rebbon. Your mouse cursor will change its appearance. Then click on the table (child table) that will have foreign key and then click on the second table (parent table) whose primary key will be referred by the new foreign key.
) item on the Palette tab of Rebbon. Your mouse cursor will change its appearance. Then click on the table (child table) that will have foreign key and then click on the second table (parent table) whose primary key will be referred by the new foreign key.
Do it with the Customers and Cities tables respectively. Then with the Orders and Customers tables. And at the end with Orders and Cars.
Database Designer for MySQL has automatically created CityID column in Customers table, the same as the CityID in the Cities table and set the foreign key.
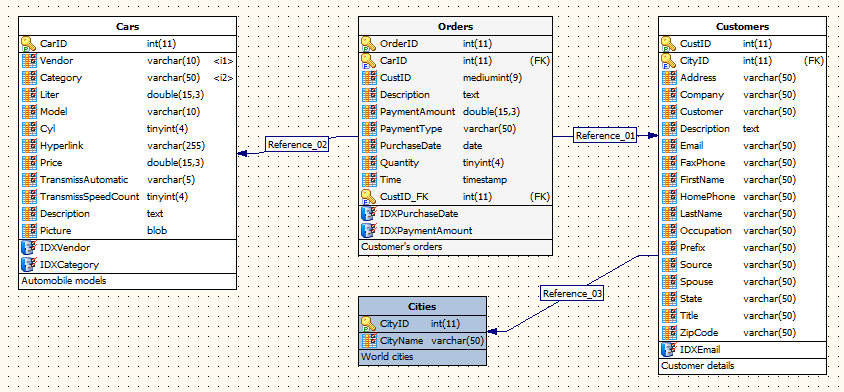
After creating all above references you will get the following diagram:
Now let's examine the Preview tab of the Customers table:
DROP TABLE IF EXISTS `Customers`;
CREATE TABLE `Customers` (
`CustID` int(11) UNSIGNED NOT NULL AUTO_INCREMENT,
`CityID` int(11) UNSIGNED NOT NULL DEFAULT '0',
`Address` varchar(50),
`Company` varchar(50),
`Customer` varchar(50),
`Description` text,
`Email` varchar(50),
`FaxPhone` varchar(50),
`FirstName` varchar(50),
`HomePhone` varchar(50),
`LastName` varchar(50),
`Occupation` varchar(50),
`Prefix` varchar(50),
`Source` varchar(50),
`Spouse` varchar(50),
`State` varchar(50),
`Title` varchar(50),
`ZipCode` varchar(50),
PRIMARY KEY(`CustID`),
INDEX `IDXEmail`(`Email`),
CONSTRAINT `Reference_03` FOREIGN KEY (`CityID`)
REFERENCES `Cities`(`CityID`)
ON DELETE NO ACTION
ON UPDATE NO ACTION
)
ENGINE=INNODB
COMMENT = 'Customer details';
You have created references between tables of our diagram and corresponding foreign keys.
Please note:
By default Database Designer for MySQL draws references automatically using shortest line between table shapes on diagram with reference's label placed in the center of this line. Sometimes this can lead to references crossing, or reference's label can fit below table shape. Starting from version 2.0 you can route references manually to avoid this. Take a look at Manual Reference Drawing topic.
At this stage you will know how to find errors which usually occur during the process of designing a diagram.
Database Designer for MySQL can verify your diagram for consistency and find typical errors in database design and maintaining processes.
Select the Diagram | Check Diagram menu item or press F4 to run the Check Diagram tool. The Check Diagram tool will verify your diagram for most frequent errors, such as table and column naming uniqueness, indexes availability and so on.
The Check Diagram dialog allows you to select the types of the errors you want to verify:
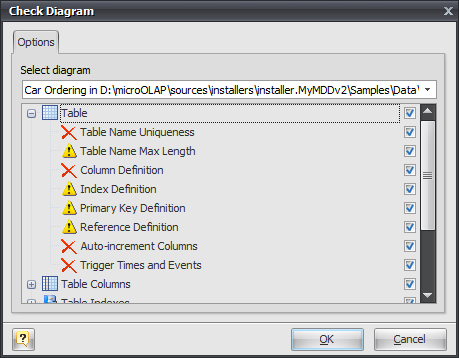
Click the OK button to execute the selected checks.
You can see the errors and warnings that were found in the diagram by the Check Diagram tool in the Result List docking window:
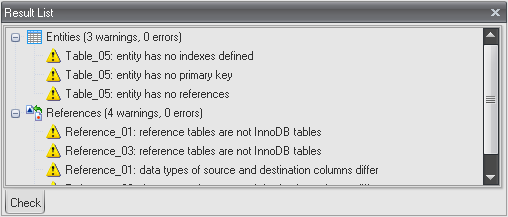
This information will help you to correct errors, i.e. rename tables and columns, add appropriate indexes to tables and so on.
Stage 10. Generating the database
This stage will show you how to generate database in working MySQL server or save the SQL script that corresponds to your diagram.
When you finish creating the diagram, you can generate the database on MySQL server.
First, you need to establish a connection to your database. Select Database | Connect to start the Database Connection Manager. Press Add button to create new Connection Profile.
You will get the following dialog:
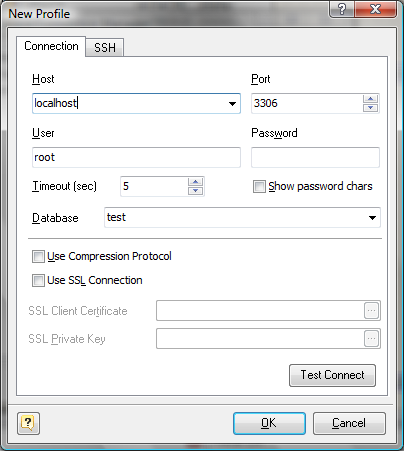
Enter the connection parameters: Host, Port, User, Password, and select a Database from the drop-down list. Then click the OK button to put the connection parameters to the list of available connections. After that click the OK button to establish connection to your database.
Now you are able to generate the database.
Select Generate Database ( ![]() ) item on Database tab of the Ribbon to start the Database Generation tool:
) item on Database tab of the Ribbon to start the Database Generation tool:
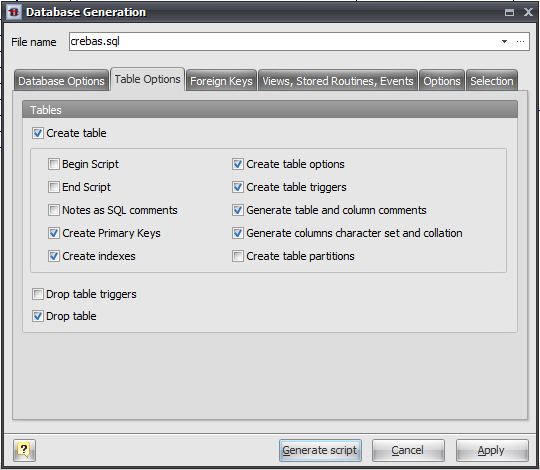
This dialog allows you to setup the database generation options: select whether to generate tables, indexes, columns, enable table comments, etc. In the Selection tab of the dialog you can select tables for generating. To select a file for storing the generated script use the File name edit box.
Click the Generate Script button to generate consecution of SQL statements for creating your database.
After the process is finished, Database Designer for MySQL will display the generated SQL statements within the SQL Executor window. You can edit them according to your needs.
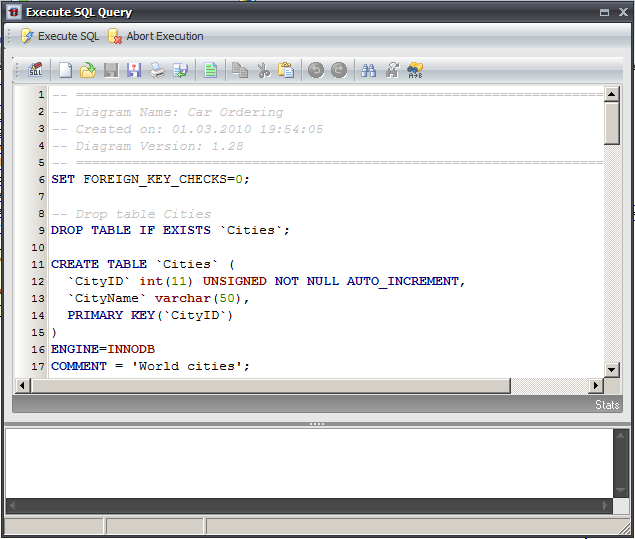
To run the statements in the database click the Execute SQL button.
The process of statements executing will be shown in the bottom of the dialog.
You have generated your database from designed diagram.
Stage 11. Altering the diagram
Let's start learning about one of the most powerful Database Designer for MySQL features - synchronizing the database with your diagram. Below we will make some changes to our diagram and then synchronize it with the database.
Let's assume, that we have to store a new car characteristic, e.g. weight. So, we need to add the Weight column to the Cars table.
Double-click on the Cars table to call the Table Properties editor. Then click the Add button to create a new column. Enter the name of the new column - Weight and attach MEDIUMINT data type to it. Click the OK to save our modifications.
You will get about this table on the diagram:

Now you can apply that changes to the database.
Stage 12. Synchronizing database with the diagram
At this stage you will learn how to apply changes in your diagram to the database.
Please note:
Database modification usually causes multiple complex statements for database structure modification. It is possible that some of them may execute incorrectly due to the database hight load. It's recommended to make a backup of your database before applying structure changes to it.
Click on the Database | Modify Database menu item to start the Database Modification tool.
In the Options tab you can set modification parameters: delete existing tables in the database, new table creation options, etc. The Selection tab allows you to select tables you want to modify.
Click OK to generate the database modification script.
Generated script will be shown in the the SQL Executor window and consist of required modification statements to bring the database to diagram state. You can edit the generated statements according to your special needs. After you've finished click on the Execute SQL button to apply modifications to the database.
As you can guess, it is hard work to create these modification statements manually: alter tables are not always easy and handy, often a simple change of a database structure may cause multiple SQL modification statements.
We have examined most of the main features and tools of Database Designer for MySQL. Using Database Designer for MySQL you can perform many complex and frequent task for database design and maintenance in easy-to-use graphical environment. We wish you successful and productive work with Database Designer for MySQL!
See also:
Tutorial: Using Domains